The modern world requires modern solutions. Whenever we talk about a good and maintained garden, we think about where you can play easily. But playing in the park may cause problems such as frequent high-level gardening, which may be very expensive. So we have a solution to this problem of yours. We at clear view grass, offer great synthetic artificial grass for your garden.
Clear view grass is a company that offers you excellent artificial grass in Dubai, including sports grass, football grass and many other types of grass. In this blog, you will learn how synthetic grass installation is helpful and the complete step-by-step process of synthetic artificial grass installation by clear view grass.
How Synthetic Artificial Grass Installation is Helpful
Synthetic Artificial grass installation is a very important and modern method of installing grass on the surfaces where you cannot grow grass, such as rooftops or infertile soil. It helps in many ways, such as:
- It is low-maintenance.
- It provides a surface where you can play all year round without investing extra money.
- There are multiple grass design options to be installed.
- The method is cost-effective and long-lasting.
- Your pets can play in this as it is low maintenance and pet friendly.
Step-by-step Complete Process of Synthetic Artificial Grass Installation by Clear View Grass
The step-by-step process of synthetic artificial grass installation is easier than other processes. It is as follows:
Removal of Existing Pipelines or Other Things from the Ground
First of all, all of the debris, dirt, sand or other things that can cause problems are removed. Also, in this step, we dig the ground where the synthetic artificial grass is about to be installed. Clear View Grass experts usually explore about 6 cm deep. It is done to check whether there is any water or gas pipeline going from that part. Later, if there is any evidence of such things, they are removed from the core. If there is evidence of the branch of a tree or roots going from underground, it is removed so that it does not grow again.
Smoothing Out the Surface
Once you remove all the debris and the extra things, you are left with a lumpy and rough surface. This surface is flattened out and evened out by removing the excess soil from the rough surface and putting that on the surface that has less ground. We flatten out the surface completely by using advanced equipment until it smoothes out. Now there is a brittle surface on which we can move easily. Let it dry and be hard enough.
Installation of Interlock
Interlock is another thing that we add to our flattened surface. It makes the ground hard enough to add any pavement or other item. It does not harden up the soil and does not give an extra boundary to the garden, but it is very important to be installed so that we can further go with another step. Clear view grass adds this to attach synthetic grass to the ground firmly.
Adding up a Geotextile Layer
The next step followed by clear view grass in installing the fake grass is the addition of a geotextile layer. This layer adds up the barrier to the removal of extra weeds. It works as a barrier that if something such as grass or weed or roots of plants or any pipelines are left in the ground, they are instantaneously removed. It confirms that nothing will now grow out that will destroy the new artificial grass.
Addition of Crashed Aggregate
The next step is the addition of crushed aggregate. We add 3-4 layers of crushed aggregate to create a firm layer of the crushed aggregate. It helps accumulate glue to the surface and assists in adding beautiful fake grass to your garden, and makes it look elegant.
Compact the Aggregate Base
Compacting the aggregate base is one of the important steps in addition to the artificial grass in the garden. If your aggregate base is not flat enough, you will get to have hurdles in the next steps, and you will end up messing up. So we at Clear View Grass use advanced equipment to flatten the aggregate base. In this way, the lawns made by us of synthetic artificial grass are smooth and great from all sides.
Checking of Smooth Aggregate Base
If it is not, maintaining a smooth aggregate base can cause various problems. So the next step that Clear View Grass follow is to ensure the surface is smooth enough. We check this using large equipment, which provides that the aggregate base is soft and the same from all sides. If not, we add or subtract the aggregate base matter from the defected area.
Add Your Desired Grass at Clear View Grass
Clear view grass offers multiple synthetic artificial grass options you can install in your garden to make it look worth looking at. You must contact clear view grass, and they will come up with five choices. You can choose the type of grass you want, and they will also guide you through what kind of grass will suit your garden. This way, you can add a perfect natural touch to your garden with the best affordable seaming grass from Clear View Grass.
Trim the Seam Lawn and Position According to Your Requirements
One of the main parts of installing the seam lawn in your garden is trimming it according to your requirements or the shape of your garden. It plays a very important role in your garden development. Trim the seam law, position appropriately and move it to the next step.
Add on the Seaming Cloth
A seaming cloth is a cloth on which you apply the glue. It is made of leather and provides a surface for the attachment of the seam garden. We do not directly put the glue on the surface of the aggregate base as it will cause multiple problems and the growth of microorganisms. Secondly, it would not allow the seam garden to attach that firmly to the ground.
Attach the Seaming Cloth Firmly to the Surface or Ground
The next step is one of the most important steps you must do most neatly. Attach your seaming cloth firmly to the ground and let it dry and attach completely.
Apply Glue to the Seaming Cloth to Achieve Consistent Thickness
Now you may apply the glue to the seaming cloth to achieve a specific thickness. Put a generous amount of the particular glue used for this purpose and fix it firmly to the ground.
Attach the Seam Lawn after drying the glue for 2-3 Minutes
When you have applied the glue, then wait for a few minutes. It will let the glue dry for some time leading to it being attached more perfectly to the seam garden. Apply pressure so that the seam garden places appropriately and does not remove after some time.
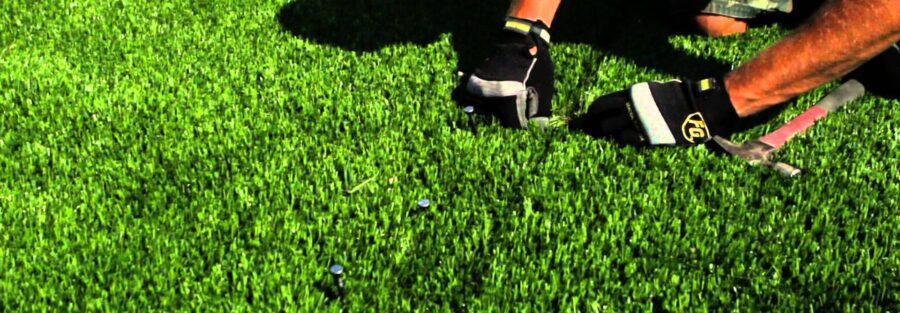
Add the Nails Where Necessary to Keep Your Seam Lawn Flat
The next step is the addition of nails where necessary. We usually add pins at the edges, so the seaming garden does not displace away from the surface.
Groom Your Grass
Now you are done with all the processing. You can enjoy your artificial grass installed with clear view grass but first get your grass area groomed. You may groom the grass by removing excess glue, dirt, dust, or garbage. Enjoy the artificial garden and play with your pets and friends in it.